# Toolbar Features
In Toolbar, items that include name and icon of features are displayed.
You can execute each feature by clicking item.
You can set ON/OFF for each Toolbar item to be displayed and change order in: User Settings > Viewer > Toolbar.
| Classification | Item | Description |
|---|---|---|
| Series | Change Series layout | |
| Image | Change Image layout | |
| Sync | Operation executed to the selected Series or images can be applied to other Series and images | |
| Compare | Compare the currently viewing Study and the most recent Study whose Modality and Body Parts match | |
| Cine | Switch playback/stop Cine | |
| Features - Mouse drag | W/L | Drag to adjust Window/Level of image |
| Pan | Drag to move position of image | |
| Zoom | Drag to change magnification ratio | |
| Magnifier | Drag to magnify image around the mouse pointer | |
| CT Value | Drag to display CT Value of image | |
| Rotate | Drag to rotate image | |
| Drag | Drag-and-drop to change position of Series | |
| Scroll | Drag-and-drop to scroll image | |
| Features - Annotation | Annotation | Excecute various operations related to Annotation |
| Features - Zoom | Fit | The Selected image is magnified to be displayed in the full frame |
| Actual PX | Display the selected image as the actual pixel data size | |
| Zoom (submenu) | Specify magnification ratio to zoom out or zoom in image | |
| Features - Flip / Rotate | Flip Horizontal | Flip image horizontally |
| Flip Vertical | Flip image vertically | |
| Rotate (submenu) | Specify the angle to Rotate image | |
| Features - Image processing | Invert Colors | Invert black and white of image |
| Pseudo Color | Apply Pseudo Color to image | |
| Image Interpolation | Change way of Image Interpolation | |
| MPR | Based on axial image, coronal image and sagittal image are reconstructed and displayed | |
| W/L Presets | Apply preset Window/Level to image | |
| Features - Others | Report | Browse Report of the selected Study |
| Reset | Image of the selected Series will return to the default display status | |
| Refresh | Reload the page | |
| Export | Export image as JPEG/PNG/BMP format | |
| Capture | It enables to paste image on the desktop and copy it to the clipboard | |
| Anonymize | Switch show/hide personal information | |
| DICOM Header | Display DICOM Header of the selected image | |
| Display | Switch show/hide various items on Viewer page | |
| Thumbnailbar | Change the display location of Thumbnailbar | |
| Help | Display Keyboard Shortcuts |
# Series
This feature is to change Series layout.
- Place the mouse pointer onto
Series. - Move the mouse pointer and click at any location.
- Series layout is changed.
# Image
This feature is to change Image layout.
- Place the mouse pointer onto
Image. - Move the mouse pointer and click at any location.
- Image layout of the selected Series is changed.
# Sync
Operation executed to the selected Series or images can be applied to other Series and images.
Place the mouse pointer onto Sync to show a menu.
| Item | Description | |
|---|---|---|
| Enabled/Disabled | Select enable/disable of Sync | |
| Scroll | Slice Location | If you scroll on the selected Series, scrolling will be executed on other Series based on Slice Location |
| Ratio | If you scroll on the selected Series, scrolling will be executed on other Series based on a location of scrollbar | |
| Normal | If you scroll on the selected Series, scrolling will be executed on other Series as many as the number of images that were scrolled | |
| Zoom | mm | Magnification ratio is changed so that the width (mm) of the selected image becomes the same as the width (mm) of images in other Series |
| px | Magnification ratio is changed so that the width (px) of the selected image becomes the same as the width (px) of images in other Series | |
| % | The same magnification ratio of the selected image is applied to image of other Series | |
| Rotate | When the selected image is rotated, image of other Series will be rotated in the same way | |
| Flip | When the selected image is flipped, image of other Series will be flipped in the same way | |
| W/L | When Window/Level of the selected image is changed, image of other Series will be changed accordingly | |
| Invert Colors | When Invert Colors is applied to the selected image, it will be applied to image of other Series as well | |
| Pseudo Color | When Pseudo Color is applied to the selected image, it will be applied to image of other Series as well | |
# Compare
This feature is to compare the currently viewing Study and the most recent Study whose Modality and Body Parts match.
Click Compare to switch ON/OFF of this feature.
# Cine
Images of selected Series are displayed continuously like a video playback.
Click Cineto switch playback/stop.
| Operation | Description |
|---|---|
Click Cine | Images are displayed continuously like a video playback Click again to stop |
| Click Playback | Images are displayed continuously like a video playback |
| Click Reverse Playback | Images are displayed continuously in the reverse order |
| Click Stop | Stop the continuous display of images |
| Move Slider | Adjust the playback speed (1 to 60 fps) |
# Features - Mouse drag
| Item | Description |
|---|---|
| W/L | Drag to adjust Window/Level of image |
| Pan | Drag to move position of image |
| Zoom | Drag to change magnification ratio |
| Magnifier | Drag to magnify image around the mouse pointer |
| CT Value | Drag to display CT Value of image |
| Rotate | Drag to rotate image |
| Drag | Drag-and-drop to change position of Series |
| Scroll | Drag-and-drop to scroll image |
# W/L
After clicking W/L, dragging on image to change Window/Level of the image of that Series.
| Operation | Description |
|---|---|
| Drag upward | WC value increases |
| Drag downward | WC value decreases |
| Drag leftward | WW value decreases |
| Drag rightward | WW value increases |
# Pan
After clicking Pan, dragging on image to move the position of the image of that Series.
# Zoom
After clicking Zoom, dragging on image to zoom the image of that Series.
| Operation | Description |
|---|---|
| Drag upward | Zoom out |
| Drag downward | Zoom in |
# Magnifier
After clicking Magnifier, dragging on image to magnify image around the mouse pointer.
# CT Value
After clicking CT Value, dragging on CT image to display CT Value.
# Rotate
After clicking Rotate, dragging on image to rotate the image of that Series.
| Operation | Description |
|---|---|
| Drag upward | Rotate counter-clockwise |
| Drag downward | Rotate clockwise |
# Drag
After clicking Drag, dragging Series and dropping it to other Series, it switches the position of both Series.
# Scroll
After clicking Scroll, dragging on image to scroll the image of that Series.
| Operation | Description |
|---|---|
| Drag upward | Scroll to prev image |
| Drag downward | Scroll to next image |
# Features - Annotation
# Annotation
Execute various operations related to annotation.
Place the mouse pointer onto Annotationto show a menu.
| Item | Description |
|---|---|
| Arrow | Draw Arrow |
| Text | Enter Text |
| Length | Draw straight line and measure the Length |
| Ellipse | Draw Ellipse and measure the area etc. |
| Rectangle | Draw Rectangle and measure the area etc. |
| Polygon | Draw Polygon and measure the area etc. |
| Angle | Measure Angle |
| Cobb Angle | Measure Cobb Angle |
| CTR | Measure CTR |
| Save Annotation | Save Annotation |
| Delete Selected Annotations | Delete the selected Annotation drawn in the selected image |
| Delete All Annotations | Delete all Annotations drawn in the selected image |
# Arrow
This feature is to draw Arrow.
- Click
Arrow. - Move the mouse while clicking on image to start drawing Arrow.
- While clicking, move the mouse pointer to the position of the Arrow tail.
- Release the mouse button to finish drawing Arrow.
# Changing the position of Arrow head
- Place the mouse pointer on Arrow head and click.
- Move the mouse pointer while clicking to change the position of Arrow head.
- Release the mouse button to determine the position of Arrow.
# Changing the position of Arrow tail
- Place the mouse pointer on Arrow tail and click.
- Move the mouse pointer while clicking to change the position of Arrow tail.
- Release the mouse button to determine the position of Arrow.
# Moving Arrow
- Place the mouse pointer on any part of Arrow other than its ends and click.
- Move the mouse pointer while clicking to move Arrow.
- Release the mouse button to determine the position of Arrow.
# Text
This feature is to enter Text.
- Click
Text. - Click where you want to enter Text.
- Dialog of "Annotation:Text" will appear.
- Enter "Text" and "Font Size".
- Click "OK".
- Entered Text is displayed at the position you clicked.
# Changing Text contents and Font Size
- Click
Text. - Dialog of "Annotation:Text" will appear.
- Change Text and Font Size, and click "OK".
- Text is edited.
# Moving Text
- Place the mouse pointer on Text and click.
- Move the mouse pointer while clicking to move Text.
- Release the mouse button to determine the position of Text.
# Length
This feature is to draw straight line and measure the Length.
- Click
Length. - Move the mouse while clicking on image to start drawing straight line.
- While clicking, move the mouse pointer to the position where drawing finishes.
- Release the mouse button to finish drawing straight line, and the Length is measured.
# Changing length and direction of straight line
- Place the mouse pointer on the end of straight line and click.
- Move the mouse pointer while clicking to change the length and direction of the straight line.
- Release the mouse button to determine the length and direction of the straight line.
# Moving straight line
- Place the mouse pointer on any part of the straight line other than its ends.
- Move the mouse pointer while clicking to move the straight line.
- Release the mouse button to determine the position of the straight line.
# Ellipse
This feature is to draw Ellipse and measure the area etc.
- Click
Ellipse. - Move the mouse while clicking on image to start drawing Ellipse.
- Release the mouse button to finish drawing Ellipse, and the area and other information are displayed.
# Changing width and height of Ellipse
- To change width of Ellipse, place the mouse pointer on either left or right end of Ellipse and click.
To change height of Ellipse, place the mouse pointer on either top or bottom end of Ellipse and click. - Move the mouse pointer while clicking to change the width and height of Ellipse.
- Release the mouse button to determine the width and height of Ellipse.
# Moving Ellipse
- Place the mouse pointer on any part of Ellipse other than its right or left end and top or bottom end, and click.
- Move the mouse pointer while clicking to move Ellipse.
- Release the mouse button to determine the position of Ellipse.
# Rectangle
This feature is to draw Rectangle and measure the area etc.
- Click
Rectangle. - Move the mouse while clicking on image to start drawing Rectangle.
- While clicking, move the mouse pointer to the position where drawing finishes.
- Release the mouse button to finish drawing Rectangle, the area and other information are displayed.
# Changing width and height of Rectangle
- Place the mouse pointer on a corner of Rectangle and click.
- Move the mouse pointer while clicking to change the width and height of Rectangle.
- Release the mouse button to determine the width and height of Rectangle.
# Moving Rectangle
- Place the mouse pointer on any part of Rectangle other than its corners and click.
- Move the mouse pointer while clicking to move Rectangle.
- Release the mouse button to determine the position of Rectangle.
# Polygon
This feature is to draw Polygon and measure the area etc.
- Click
Polygon. - Move the mouse while clicking on image to start drawing Polygon.
- Move the mouse pointer and click again to finish the first straight line of Polygon.
- Repeatedly move the mouse pointer and click to draw new lines.
- Place the mouse pointer on the start point of the drawing and click to finish Polygon, then the area and other information are displayed.
# Deforming Polygon
- Place the mouse pointer on a corner of Polygon and click.
- Move the mouse pointer while clicking to deform Polygon.
- Release the mouse button to finish deforming.
# Moving Polygon
- Place the mouse pointer on any part of Polygon other than its corners and click.
- Move the mouse pointer while clicking to move Polygon.
- Release the mouse button to determine the position of Polygon.
# Angle
This feature is to measure Angle.
- Click
Angle. - Move the mouse while clicking on image to start measuring Angle.
- Move the mouse pointer to the position where drawing of the first straight line completes.
- Release the mouse button to finish drawing the first straight line.
- Move the mouse pointer to the position where drawing of the second straight line finishes.
- Click to finish drawing of the second straight line, then Angle is measured.
# Adjusting Angle
- Place the mouse pointer on the end or intersection of the straight line, and click.
- Move the mouse pointer while clicking to move the end or intersection of the straight line.
- Release the mouse button to determine Angle.
# Moving Angle
- Place the mouse pointer on any part of the straight line other than its end or intersection, and click.
- Move the mouse pointer while clicking to move Angle.
- Release the mouse button to determine the position of Angle.
# Cobb Angle
This feature is to measure Cobb Angle.
- Click
Cobb Angle. - Move the mouse while clicking on image to start measuring Cobb Angle.
- Move the mouse pointer to the position where drawing of the first straight line finishes.
- Release the mouse button to finish drawing the first straight line.
- Move the mouse pointer to the position where drawing of the second straight line finishes.
- Move the mouse while clicking on image to start drawing the second straight line.
- Move the mouse pointer to the position where drawing of the second straight line finishes.
- Release the mouse button to finish drawing the second straight line, and Cobb Angle is measured.
# Adjusting Cobb Angle
- Place the mouse pointer on the end of the straight line and click.
- Move the mouse pointer while clicking to move the end of the straight line
- Release the mouse button to determine Cobb Angle.
# Moving Cobb Angle
- Place the mouse pointer on any part of the straight line other than its end or intersection, and click.
- Move the mouse pointer while clicking to move Cobb Angle.
- Release the mouse button to determine the position of Cobb Angle.
# CTR
This feature is to measure CTR (Cardio-Thoracic Ratio).
- Click
CTR. - While clicking the start point of medial line, move the mouse pointer to the end point of the medial line.
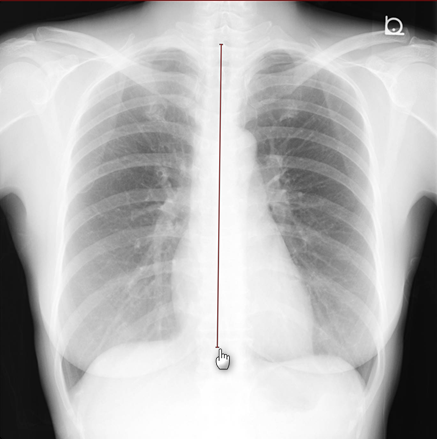
- Release the mouse button to finish the medial line, and four lines parallel to the line are displayed.
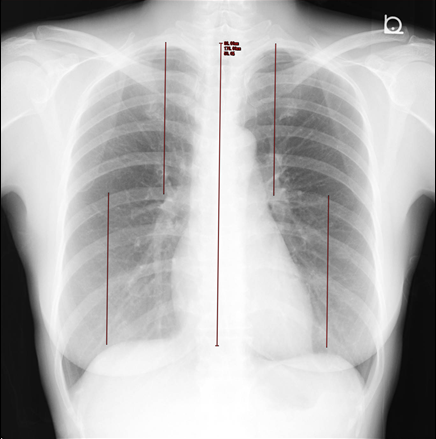
- Measure heart width using lines A and A'. And, measure thorax width using lines B and B'.
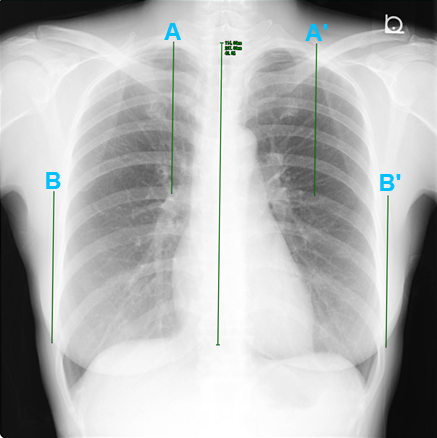
- To move four lines, place the mouse pointer on each line and move the mouse pointer while clicking.
- Release the mouse button to calculate CTR.
# Adjusting CTR angle
- Place the mouse pointer on the end of medial line and click.
- Move the mouse pointer while clicking to adjust the angle of the medial line.
- Release the mouse button to calculate CTR.
# Moving CTR
- Place the mouse pointer on the medial line and click.
- Move the mouse pointer while clicking to move the medial line.
- Release the mouse button to determine the position of CTR.
# Save Annotation
This feature is to save all Annotations drawn in the selected image.
# Delete Selected Annotations
This feature is to delete the selected Annotations.
# Delete All Annotations
This feature is to delete all Annotations drawn in the selected image.
# Features - Zoom
# Fit
The Selected image is magnified to be displayed in the full frame.
# Actual PX
This feature is to display the selected image as the actual pixel data size.
# Zoom (submenu)
This feature is to specify magnification ratio to zoom out or zoom in image.
Place the mouse pointer onto Zoomto show a menu.
| Item | Description |
|---|---|
| +1% | Increase magnification ratio by 1% |
| -1% | Decrease magnification ratio by 1% |
| +10% | Increase magnification ratio by 10% |
| -10% | Decrease magnification ratio by 10% |
| 25% | Change magnification ratio to 25% |
| 50% | Change magnification ratio to 50% |
| 100% | Change magnification ratio to 100% |
| 150% | Change magnification ratio to 150% |
| 200% | Change magnification ratio to 200% |
| 400% | Change magnification ratio to 400% |
| 800% | Change magnification ratio to 800% |
| Enter optional value | Click to display dialog of "Enter optional value" Enter a value within the range of 0 to 1,000 in the form |
# Features - Flip / Rotate
# Flip Horizontal
This feature is to flip image of the selected Series horizontally.
# Flip Vertical
This feature is to flip image of the selected Series vertically.
# Rotate (submenu)
This feature is to specify the angle to Rotate image.
Place the mouse pointer onto Rotateto show a menu.
| Item | Description |
|---|---|
| +1° | Rotate 1° to the right |
| -1° | Rotate 1° to the left |
| +10° | Rotate 10° to the right |
| -10° | Rotate 10° to the left |
| 0° | Change the angle of the image to 0° |
| 90° | Change the angle of the image to 90° |
| 180° | Change the angle of the image to 180° |
| 270° | Change the angle of the image to 270° |
| Enter optional value | Click to display dialog of "Enter optional value" Enter a value within the range of 0 to 360 in the form |
# Features - Image processing
# Invert Colors
This feature is to Invert black and white for image of the selected Series.
# Pseudo Color
This feature is to apply Pseudo Color to image of the selected Series.
Place the mouse pointer onto Pseudo Color to show a menu.
| Item | Description |
|---|---|
| Grayscale | Apply Pseudo Color "Grayscale" |
| Hot Iron | Apply Pseudo Color "Hot Iron" |
| Hot Metal Blue | Apply Pseudo Color "Hot Metal Blue" |
| PET | Pseudo Apply Color "PET" |
| PET 20 Step | Apply Pseudo Color "PET 20 Step" |
# Image Interpolation
This feature is to change way of image interpolation for image of the selected Series.
Place the mouse pointer onto Image Interpolation to show a menu.
| Item | Description |
|---|---|
| Nearest Neighbor | Apply "Nearest Neighbor" |
| Bilinear | Apply "Bilinear" |
| Bicubic | Apply "Bicubic" |
# MPR
Based on axial image, coronal image and sagittal image are reconstructed and displayed.
Select Series of axial image and click MPR.
# W/L Presets
This feature is to apply preset Window/Level to image.
Place the mouse pointer onto W/L Presets to show a menu.
| Item | Shortcut Key | Description |
|---|---|---|
| Default | 0 | Change the values of WW and WC to the values described on DICOM tag of the image |
| Preset | 1 to 8 | Change the values of WW and WC to preset values |
| Full Dynamic | 9 | Decide the values of WW and WC using "Smallest Image Pixel Value" and "Largest Image Pixel Value" of DICOM tag In the absence of necessary tag information, Window/Level is determined and displayed using the minimum and maximum values of the actual pixel values. |
| Enter optional value | None | After clicking, Dialog of "Enter optional value" will appear. - WW: Enter a value within the range of 1 to 99,999 in the form. - WC: Enter a value within the range of -99,999 to 99,999 in the form. |
# Features - Others
| Item | Description |
|---|---|
| Report | Browse Report of the selected Study |
| Reset | Image of the selected Series will return to the default display status |
| Refresh | Reload the page |
| Export | Export image as JPEG/PNG/BMP format |
| Capture | It enables to paste image on the desktop and copy it to the clipboard |
| Anonymize | Switch show/hide personal information |
| DICOM Header | Display DICOM Header of the selected image |
| Display | Switch show/hide various items on Viewer page |
| Thumbnailbar | Change the display location of Thumbnailbar |
| Help | Display Keyboard Shortcuts |
# Report
This feature is to browse Report of the selected Study.
If there is a saved Report, the Report will be displayed.
If there is no saved Report, the page for creating a Report will be displayed.
Reference Link
# Reset
Images of selected Series will return to the default display status.
| Type | Description |
|---|---|
| Items to be Reset | - Window/Level - Invert Colors - Pan - Zoom - Rotate - Flip Horizontal - Flip Vertical |
| Items not to be Reset | - Series Layout - Image Layout - Annotation |
# Refresh
This feature is to Reload the page.
# Export
This feature is to Export image as JPEG/PNG/BMP format.
- Click
Exportin Toolbar. - Dialog of "Export" will appear.
- Select File Format.
| File Format |
|---|
| JPEG |
| PNG |
| BMP |
- Select Series to Export.
| Series | |
|---|---|
| Current Series | Export the current Series only |
| Displayed Series | Export the displayed Series only |
| All Series | Export all Series |
- Specify Size of the image.
| Size | |
|---|---|
| Current Size | Export image as current Size |
| Original Size | Export image as the actual pixel data size |
| Specify Size | Specify height and width to Export |
- Select item to display on the image.
| Display | |
|---|---|
| Overlay | Display Overlay |
| Annotation | Display Annotation |
| Orientation | Display Orientation |
| Ruler | Display Ruler |
- Specify Option.
| Option | |
|---|---|
| Anonymize Overlay | Anonymize personal information (Patient ID, Patient Name, and Patient Birth Date) to be displayed on Overlay |
- Click "Export".
- File is downloaded and saved in arbitrary location.
# Capture
This feature is to enable to paste image to desktop, folder, other applications, or copy and paste to clipboard.
To end Capture, press ESC key or click a part outside Viewer (grayed-out part).
Caution
It may not work properly depending on your browser or the specification of applications
# Anonymize
This feature is to switch show/hide personal information.
- Click
Anonymize. - Anonymize personal information (Patient ID, Patient Name, and Patient Birth Date) and all will be displayed as
****. - Click
Anonymizeonce again to cancel Anonymize.
# DICOM Header
Dialog of "DICOM Header" will appear and it displays DICOM Header of the selected image.
# Display
This feature is to switch show/hide various items on Viewer page.
Place the mouse pointer onto Display to show a menu.
| Item | Description |
|---|---|
| Annotation | Switch show/hide Annotation |
| Overlay | Switch show/hide Overlay |
| Orientation | Switch show/hide Orientation |
| Ruler | Switch show/hide Ruler |
| Reference Line | Switch show/hide Reference Line |
| Scrollbar | Switch show/hide Scrollbar |
| Toolbar | Switch show/hide Toolbar |
| Thumbnailbar | Change the display location of Thumbnailbar |
# Thumbnailbar
This feature is to swith display location of Thumbnailbar.
Place the mouse pointer onto Thumbnailbarto show a menu.
| Item | Description |
|---|---|
| Left | Display Thumbnailbar on left screen |
| Top | Display Thumbnailbar on top screen |
| Right | Display Thumbnailbar on right screen |
Reference Link
# Help
Dialog of "Keyboard Shortcuts" will appear and it displays list of Keyboard Shortcuts.
Reference Link